Friday, December 31, 2010

Christmas PJ's for Girl and Doll

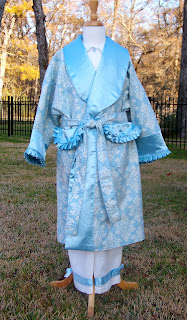
I wonder about my sanity when I take on a project like this between Thanksgiving and Christmas.  My daughter fell in love with Rebecca's PJ outfit from American Girl.  (pictured above) Being the crafty mom, I decided to make it, not buy it.  My local heirloom shop, Buttons and Bows, had just gotten in the Lily and Will fabric line from Moda.  I thought it was a good match for my project.


The robe pattern is by Favorite Things and is called"the robe."  I only added the pleated satin trim, satin lapels, and ribbons to make it girly.


I love the tie on this robe, it is sewn on and won't come off the robe.  No more complaints about lost ties.


The girl PJ's pattern is Gigi by Children's Corner.  I added the blue ribbon and bows.  I made a size 8 for my six year old.  The outfit is a little large, but not by much.  


This is a close up. I love the details on the sleeves.  It is so stylish for the time period of Rebecca.


I had a little extra fabric and I put together Girly Gown by Hope Yoder.  The gown went together in 30 minutes.  Loved  the quickness, but it is a little big for my daughter.  I think I made a size 8.


The robe was lined by the blue quilted fabric in the Lily and Will fabric line.


This is my version of Rebecca's PJs.  The robe is from McCall's M5019.  Above on the right is the American Girl store outfit.


The PJ pattern is from Simplicity 5276 with a slight gathering of the legs to make it reflect the Gigi pattern.


The Girly Gown pattern comes with 18" doll version, so her is one to match the big girl.  This too went together in no time.

My daughter loved her new PJ and robe combo.  She slept in it almost the whole Christmas vacation.  I hope you enjoy the pictures.


Friday, December 17, 2010

Christmas Play Outfits from Sassy Skirt by Children's Corner


This skirt it Sassy Skirt by Children's Corner patterns.  I kept the yoke from the pattern and redid the skirt to highlight the cute Christmas Michael Miller fabrics.  I have talked about why I love this skirt in another post.


I cut strips of fabric into 4" by 12" strips and then sewed them together for the skirt.  I added a hem band to finish off the outfit.  The t-shirt is from Target with Planet Applique's Ornament Alphabet Applique.  I made these at Thanksgiving, so I am trying to remember, but I think I used the 6x10 embroidery for the shirt.  It did not look like the print out from Planet Applique, but I think I like it better, it matches the scrappy fabric from the skirt.


This is Sassy Skirt in view B with an added hem band.  The embroidery is from LynniePinnie.com and is called Retro Christmas Trees.  They match the Michael Miller Christmas fabric exactly.  


These are great additions to my daughter's wardrobe to wear to fun parties and family gatherings. I can save the smocked outfits for times when we won't spill food or climb trees.  

Friday, December 10, 2010

Serendipity Studio Catherine in a Christmas Jacket


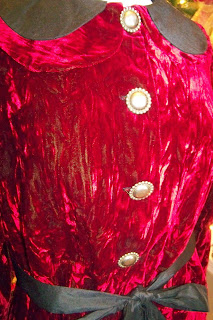
I am so in love with this jacket pattern, the Catherine Coat, by Serendipity Studio.  I am so pleased with the results of the sewing, but it was a journey to finish.  A few years ago, I had found this lovely red and black crushed velveteen at a bargain price.  I even have it in a beautiful green, which may be next years' project.  I decided to tackle something for me for Christmas with those fabrics.  After searching through my patterns, I pulled out the jacket pattern, the Catherine Coat.  I also used the yoke from Simplicity 2410 for the skirt. 

As you can see the jacket is a great fit.  I made a large size and was concerned about the fit (ok, I didn't make a muslin and I usually do).  I have made her skirts in a large and ended up taking it in by a few inches.  The gathering in the bodice was just enough without being too much.  The gathering in the sleeves was just enough without becoming a puffy sleeve.  The length was just right and hits right at the hipline.  The pattern has three hem lengths and a few options on the embellishments.  The only interesting note is the cuff is not a pattern piece, but a simple statement about if you want a large or small cuff, cut this size.  I chose the larger size due to the fabric type.  Looking back, I could have gone either large or small.  The jacket is not lined, which was a great choice for this project.  This jacket would not be worn with another shirt underneath, so even using it for something else would not include a lining.  (Hope this helps someone thinking about constructing one themselves.)


I chose to use black silk shantung for the collar, belt, facings, and trim around the cuffs.  I also used it in the underside of the red collar.  I referred to my trusted Sandra Betzina book, Fabric Savvy.  It said to use a walking foot or a roller foot.  I think I slept between reading and doing and used a teflon foot.  It sure was a pain to even sew a straight seam.  My sweet advisors on the Delphi website reminded me that I needed less pressure, not even pressure on the foot.  A good lesson I won't forget to use when I get around to the green velveteen.


I found these lovely silver buttons at the International Quilt Festival in Houston.  I was determined to use them, but after trouble sewing a straight seam, I was distraught at the thought of buttonholes.  (Even more distressing was the thought of bound buttonholes.)  I tested a sample on a scrap and had no problems.  Was it possible to easily sew in a buttonhole without stabilizer or anything special?  YES!  I did choose a jacket buttonhole stitch on my Viking sewing machine, but that is all I did for better than expected buttonholes.


I will review this cute skirt pattern later, but this is Simplicity 2410.  I love the fit of the waist.  It has a side zipper (I used a black invisible one).  I gathered the skirt and stitched it to the waistband.  It is so soft and comfortable to wear.  One note about crushed velveteen, the black fabric has a shimmer to it and it doesn't matter what I do, the hem looks crooked due to the shimmer of the fabric.

I am very pleased with the results of this jacket and I look forward to using the other jacket patterns from Serendipity Studio.

Friday, December 3, 2010

Smocked Christmas Dress


This cute dress is a smocked bishop pattern from Australian Smocking and Embroidery.  I used a size 5 from Beautiful Bishops and then smocked it using the Ring of Roses pattern from Sew Cute Couture.  I have found that most of the traditional bishop patterns can be used interchangeably with AS&E.  Since this was very traditional, it was an easy swap for the size I needed.  I have found the AS&E's bishop pattern fits my daughter well and has just the right amount of puff in the sleeves and ease around the bottom of the dress.  The accent candy cane fabric was used around the bottom to add another whimsical element and it is trimmed with red and white whipped stitched piping.  This type of piping requires a good ironing after each wash.


This is a picture of the original dress, made only to a size 3T.  I know they look worlds different, but I think even Gain Doane (original designer) would be delighted by reusing a pattern in such a different way.  I fell in love with the whimsical Christmas print, but was stumped on how to smock it.  It needed lots of thread coverage to give it balance and cover the fabric that showed bits and pieces of the stars in the pleated fabric.  This pattern of Ring of Roses was perfect.  It has great coverage and is very fast to smock.  I dropped the roses from the original pattern and added just a button on each heart.  It really made the smocking match the candy cane stripe in the accent fabric.  


This is an up-close of the smocking.  I used red, lime green, and hot pink thread.  


The back is finished simply with red buttons all the way down the back.

My daughter looks just as cute as a button in the dress or you could say as sweet as a candy cane.